All Categories
Featured
Table of Contents
- – Rv Slide Out Roof Repair Placentia, CA
- – OCRV Center
- – Roof Repair For Rv Placentia, CA
- – Replace Rv Roof Placentia, CA
- – Rv Roof Leak Repair Near Me Placentia, CA
- – Rv Roof Repair Service Near Me Placentia, CA
- – Rv Fiberglass Roof Repair Placentia, CA
- – Rubber Roof Installation Placentia, CA
- – Rv Roof Repair Near Me Placentia, CA
- – Rubber Roof For Camper Placentia, CA
- – Motorhome Roof Replacement Placentia, CA
- – Rv Rubber Roof Replacement Placentia, CA
- – Rv Roof Replacement Placentia, CA
- – Best Rv Roof Repair Placentia, CA
- – OCRV Center
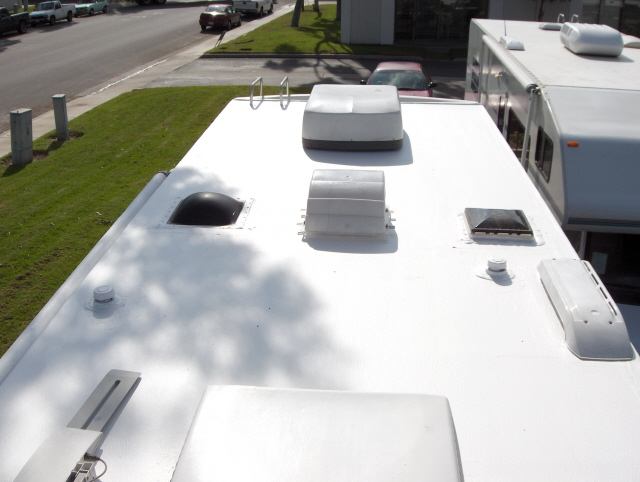
Rv Slide Out Roof Repair Placentia, CA
Roof covering demolition, of training course. As soon as completed, we can get to function on the Motor home roof repair work.
We removed any type of timber that has actually been harmed. Once the harmed sections have actually been eliminated we're all set to replace those sections with brand-new timber. This RV roofing repair work addresses both an old roofing in addition to underlying damages influencing the honesty of the RV. Once the structure under is audio, we begin the procedure of sealing it back up and changing that old rubber roof.
We also require to place back all of the vents we eliminated, making certain the seals are great and tight to prevent more damages. Remember, one little crack in a seal is all it takes to allow water in to damage that beautiful brand-new roofing all over once again.
The brand-new roofing system is water-tight, looks excellent, and is a fantastic upgrade from the original, wearing away rubber roof covering. This kind of practical RV upgrade you make into wonderful brand-new RV inside attributes. Since you've seen the basics of motor home roof fixing and motor home rubber roofing system replacement, you might be lured to try it on your own.
Roof Repair For Rv Placentia, CA
We understand that some of you like to function on your RVs and try your own Motor home repairs. If you have actually got a leaking roof or an old rubber roofing system that needs replacement and you require some advice, bring it down and we can chat you through the actions. Much better still, bring it in and let us look at it prior to you begin any kind of job
Over time, your Motor home's roof covering can end up being used, damaged, or create leakages, which can endanger its stability and lead to even more considerable issues. If you're experiencing any of these problems, it may be time to think about replacing your Motor home roofing system.
There are numerous indications that indicate your recreational vehicle calls for a roof covering replacement. These indications consist of water leakages, sagging or soft places on the roofing system, cracks or divides in the roofing product, too much wear and tear, and noticeable sunshine coming with the roofing. If you see any one of these signs, it is critical to address them promptly to avoid additional damages to your recreational vehicle.
On standard, motor home roofing substitute prices can vary from $2,000 to $10,000. It's crucial to consider the lasting advantages and possible financial savings that come with buying a premium roof substitute. When choosing a recreational vehicle roofing system product, a number of elements come right into play. These consist of longevity, weight, insulation homes, upkeep needs, and price.
Replace Rv Roof Placentia, CA
Choosing in between a do-it-yourself (DO IT YOURSELF) technique or professional installation for your recreational vehicle roof replacement relies on your skills, experience, and offered time. While do it yourself installation can conserve you cash, it needs sufficient understanding and proficiency to ensure a correct and watertight setup. On the various other hand, professional installment supplies the advantage of expertise, experience, and guarantees.
Check and clean up the seamless gutters and downspouts to make certain appropriate water drainage and protect against water pooling on the roofing system. Use a safety covering or sealer to the roofing system surface as advised by the maker. This can give extra UV security and aid prolong the life of the roofing. Avoid walking on the roofing unless required.
The price of setting up a Recreational vehicle roofing can vary based on aspects like Recreational vehicle dimension, chosen roofing product, and whether professional installation is requested. If your Recreational vehicle's roof is harmed, put on out, or dripping, a roofing replacement is often essential to ensure the structural stability of your RV.
Fixing a rip in a RV roof depends on the extent and kind of roofing system material. For minor splits, you can use roof covering repair service tape or sealant particularly developed for RV roofing systems. Bigger holes might require patching with a compatible roof covering product or seeking specialist assistance. RV roof covering layers can provide added defense and extend the life expectancy of your roof.
Rv Roof Leak Repair Near Me Placentia, CA
Purchasing a premium RV roofing system finish can be worth it for long-term roof covering upkeep. Flex Seal items are commonly made use of as short-lived or quick-fix options for small leakages or cracks. While they might provide a short-term service, it's suggested to consult with an expert and utilize correct recreational vehicle roofing system repair service products for a more long-term and reliable repair.
PVC roofs offer superb sturdiness, resistance to UV rays, and low upkeep demands. They are taken into consideration a reliable alternative for Motor home roofs, however the best option depends on your particular demands and preferences.
Resealing your recreational vehicle roofing system need to be done on a regular basis to keep its honesty and prevent leakages. As a general guideline, it's recommended to reseal your recreational vehicle roof covering at the very least yearly or according to the maker's referrals. Whether to leave your motor home slides in or out relies on the circumstance and individual choice.
Take into consideration factors such as protection, weather, and comfort when deciding. Motor home roofing system leaks are fairly usual because of different variables such as age, wear and tear, inappropriate upkeep, or extreme weather. Regular evaluations and positive upkeep can aid lessen the incident of leaks. The choice to amount to a recreational vehicle due to water damages depends upon the level of the damage and the insurance provider's analysis.
Rv Roof Repair Service Near Me Placentia, CA
Insurance policy insurance coverage for RV delamination relies on the certain plan and the root cause of delamination. It is necessary to assess your insurance plan and seek advice from your supplier to comprehend the coverage for delamination and any kind of appropriate deductibles. Claiming water damages on a camper depends on your insurance coverage and the circumstances bordering the water damages.

It's recommended to look for expert aid for this kind of repair service to make certain appropriate structural stability and prevent future problems. Fiberglass recreational vehicle roofs provide advantages such as resilience, lightweight construction, and excellent insulation properties. They are less susceptible to splitting and can supply much better defense against severe climate problems contrasted to a few other roof covering products.
Tarping your motor home roof can provide short-lived protection versus leakages or additional damages during expanded periods of storage or when your RV is not in use. Making sure the tarp is securely fastened and correctly sustained is critical to avoid water merging and roof covering damage. Yes, covering your recreational vehicle while living in it is possible and can supply extra security against the elements.
Select a cover that fits your motor home's size and supplies adequate ventilation to prevent moisture accumulation. Whether it's alright to stand on a RV roofing system depends on the maker's standards and the sort of roofing material. Specific RV roofs can manage restricted weight, while others may require additional support or precautions.
Rv Fiberglass Roof Repair Placentia, CA
Dealing with your RV roof covering is important for preserving the total problem and longevity of your mobile home. Normal inspections, timely repair work, and proper maintenance can assist protect against costly damages and extend the life-span of your recreational vehicle roof. In this post, we reviewed the indicators that indicate the need for a motor home roofing system replacement, the typical kinds of motor home roofings readily available, elements to think about when picking a roof product, the typical cost of a RV roof covering replacement, and the advantages and disadvantages of do it yourself versus professional setup.
Older Motor home roof coverings often tend to end up being weak, crack and leakage more easily, leading to costly repairs. You're going to also desire to take into consideration the material utilized to build your Motor home roofing system.
Rubber Roof Installation Placentia, CA
When it comes to changing a Recreational vehicle roof covering, there are numerous different kinds of roofings to select from. The most usual type of Motor home roofing is a rubber roof.
Another common kind of roof covering is a steel roofing. Fiberglass roofs are additionally preferred for RV roofing systems.
Rv Roof Repair Near Me Placentia, CA
They also cost much less than metal roofs. Fiberglass roofings are heavy and call for unique tools for setup. There are acrylic roofings.
When it comes to replacing a Recreational vehicle roof covering, there are two alternatives: Do it yourself or expert setup. It is crucial to keep in mind that Do it yourself installation is not for everyone.
Rubber Roof For Camper Placentia, CA
Specialist setup is likewise much faster than DIY setup, so you can obtain back to enjoying your motor home sooner. Specialist installation can be more expensive than Do it yourself installment. Not only will fixing your motor home roof with the Fluid Rubber Recreational Vehicle Roof Covering System be more economical, however it will additionally be much less labor intensive and is much simpler to do.
Hello there People, We remain in the midst of changing the roof covering on our 2011 37' Carriage Cameo. We believe the damages was sustained by the installer of the air conditioner systems, as it is a straight leak (up and down) via the EPDM, timber outdoor decking, and so on. We have gotten an initial price quote from the store of $12k for the roofing system replacement.
Motorhome Roof Replacement Placentia, CA
The price quote is initial as they have offered this quote without them seeing the gear at all. I was believing $5-7k maybe, yet 12k? Wow - that simply appears like a heap of dough.
Thermoplastic Olefin (TPO) is an energy-efficient and UV-resistant material frequently used in Recreational vehicle roofs. While less usual, some RVs include aluminum roofs.
Rv Rubber Roof Replacement Placentia, CA
Specialist labor costs are usually included in the above quotes. Choosing for do it yourself setup may decrease labor expenses, yet it requires a specific skill degree and time commitment. DIYers must be mindful of material expenses and guarantee the application is done appropriately. Now, let's discover the cost-saving benefits of utilizing SEMCO Liquid Membrane for motor home roofing fixing: The charm of SEMCO Fluid Membrane exists in its affordability.
This eliminates the requirement for various items based on your Recreational vehicle's roof covering product, streamlining the fixing process. SEMCO Liquid Membrane layer adapts to the movement of the RV during traveling and adjustments in temperature.
When it comes to changing a RV roof covering, there are two options: Do it yourself or expert setup. It is vital to keep in mind that Do it yourself installation is not for everyone.
Professional installment is likewise faster than DIY installment, so you can get back to appreciating your RV sooner. Nevertheless, expert setup can be more pricey than DIY setup. Not only will fixing your motor home roofing system with the Liquid Rubber RV Roof Covering Coating System be a lot more economical, but it will also be much less labor intensive and is a lot less complicated to do.
Rv Roof Replacement Placentia, CA
Hey there Individuals, We remain in the middle of replacing the roofing system on our 2011 37' Carriage Cameo. We think the damages was suffered by the installer of the air conditioning devices, as it is a direct leak (up and down) with the EPDM, timber outdoor decking, etc. We have obtained an initial estimate from the shop of $12k for the roofing system replacement.
The quote is initial as they have actually provided this price quote without them seeing the rig at all. I was assuming $5-7k maybe, however 12k? Wow - that simply appears like a heap of dough.
Thermoplastic Olefin (TPO) is an energy-efficient and UV-resistant product commonly used in Motor home roofings. While much less usual, some Recreational vehicles feature light weight aluminum roofs.
Best Rv Roof Repair Placentia, CA
Opting for Do it yourself installation might decrease labor expenses, however it needs a certain skill degree and time dedication. DIYers must be aware of material prices and make certain the application is done appropriately.
OCRV Center
Address: 23281 La Palma Ave Yorba Linda, CA 92887Phone: (714) 909-1444
Email: [email protected]
OCRV Center
This gets rid of the need for different items based on your Motor home's roof product, simplifying the repair process. SEMCO Fluid Membrane layer adapts to the movement of the Recreational vehicle throughout traveling and adjustments in temperature.
Class C Rv Roof Repair Placentia, CARv Roof Repair Service Near Me Placentia, CA
Epdm Rv Roof Repair Placentia, CA
Roof Repair For Rv Placentia, CA
Best Rv Roof Repair Placentia, CA
Roof Repair For Rv Placentia, CA
Rv Roof Repair Service Near Me Placentia, CA
Rv Roof Replacement Placentia, CA
Motorhome Roof Replacement Placentia, CA
Rv Roof Repair Near Me Placentia, CA
Rv Rubber Roof Repair Placentia, CA
Rv Rubber Roof Replacement Cost Placentia, CA
Epdm Rv Roof Repair Placentia, CA
Replace Rv Roof Placentia, CA
Replace Rv Roof Placentia, CA
Rubber Roof For Rv Placentia, CA
Rv Trailer Roof Repair Placentia, CA
Rv Rubber Roof Replacement Cost Placentia, CA
Rv Slide Out Roof Repair Placentia, CA
Rv Slide Out Roof Repair Placentia, CA
Class C Rv Roof Repair Placentia, CA
Roof Repair For Rv Placentia, CA
Rv Rubber Roof Repair Placentia, CA
Motorhome Roof Replacement Placentia, CA
Epdm Rv Roof Repair Placentia, CA
Rv Roof Repair Placentia, CA
Rv Roof Leak Repair Placentia, CA
Class C Rv Roof Repair Placentia, CA
Rv Roof Leak Repair Placentia, CA
Rv Roof Maintenance Placentia, CA
Rv Roof Repair Near Me Placentia, CA
Rubber Roofing For Rv Placentia, CA
Repair Rv Roof Placentia, CA
Best Rv Roof Repair Placentia, CA
Roof Repair For Rv Placentia, CA
Rubber Roofing For Rv Placentia, CA
Resealing Rv Roof Placentia, CA
Rv Roof Leak Repair Placentia, CA
Rubber Roof For Rv Placentia, CA
Best Rv Roof Repair Placentia, CA
Rv Slide Out Roof Repair Placentia, CA
Rubber Roof For Rv Placentia, CA
Resealing Rv Roof Placentia, CA
Rv Roof Repair Fiberglass Placentia, CA
Rv Fiberglass Roof Repair Placentia, CA
Rv Roof Repair Placentia, CA
Resealing Rv Roof Placentia, CA
Class C Rv Roof Repair Placentia, CA
Rv Roof Repair Service Near Me Placentia, CA
Rv Trailer Roof Repair Placentia, CA
Rv Roof Leak Repair Near Me Placentia, CA
Rv Roof Repair Near Me Placentia, CA
Rv Rubber Roof Maintenance Placentia, CA
Rv Roof Maintenance Placentia, CA
Rubber Roof Installation Placentia, CA
Rubber Roof Installation Placentia, CA
Rubber Roofing For Rv Placentia, CA
Best Rv Roof Repair Placentia, CA
Rv Roof Repair Fiberglass Placentia, CA
Rv Slide Out Roof Repair Placentia, CA
Resealing Rv Roof Placentia, CA
Rv Slide Out Roof Repair Placentia, CA
Rv Slide Out Roof Repair Placentia, CA
Rv Roof Maintenance Placentia, CA
Rv Trailer Roof Repair Placentia, CA
Rv Roof Repair Near Me Placentia, CA
Rubber Roof For Rv Placentia, CA
Best Rv Roof Repair Placentia, CA
Rubber Roofing For Campers Placentia, CA
Class C Rv Roof Repair Placentia, CA
Motorhome Roof Replacement Placentia, CA
Best Rv Roof Repair Placentia, CA
Rv Slide Out Roof Repair Placentia, CA
Roof Repair For Rv Placentia, CA
Rv Roof Repair Near Me Placentia, CA
Roof Repair For Rv Placentia, CA
Rubber Roofing For Rv Placentia, CA
Rubber Roof Installation Placentia, CA
Close By Seo Companies Placentia, CA
Finding A Local Seo Agency Placentia, CA
OCRV Center
Table of Contents
- – Rv Slide Out Roof Repair Placentia, CA
- – OCRV Center
- – Roof Repair For Rv Placentia, CA
- – Replace Rv Roof Placentia, CA
- – Rv Roof Leak Repair Near Me Placentia, CA
- – Rv Roof Repair Service Near Me Placentia, CA
- – Rv Fiberglass Roof Repair Placentia, CA
- – Rubber Roof Installation Placentia, CA
- – Rv Roof Repair Near Me Placentia, CA
- – Rubber Roof For Camper Placentia, CA
- – Motorhome Roof Replacement Placentia, CA
- – Rv Rubber Roof Replacement Placentia, CA
- – Rv Roof Replacement Placentia, CA
- – Best Rv Roof Repair Placentia, CA
- – OCRV Center
Latest Posts
Evaporative Cooler Rust Repair Alhambra
Home Hvac Maintenance Alhambra
Air Conditioner Maintenance La Canada Flintridge
More
Latest Posts
Evaporative Cooler Rust Repair Alhambra
Home Hvac Maintenance Alhambra
Air Conditioner Maintenance La Canada Flintridge