All Categories
Featured
Table of Contents
- – Roof Repair For Rv Villa Park, CA
- – OCRV Center
- – Rv Roof Maintenance Villa Park, CA
- – Rubber Roof Installation Villa Park, CA
- – Rv Roof Replacement Villa Park, CA
- – Rv Trailer Roof Repair Villa Park, CA
- – Rubber Roof Installation Villa Park, CA
- – Rubber Roofing For Rv Villa Park, CA
- – Rubber Roof Installation Villa Park, CA
- – Rv Roof Replacement Villa Park, CA
- – Replace Rv Roof Villa Park, CA
- – Rv Roof Leak Repair Near Me Villa Park, CA
- – Rv Trailer Roof Repair Villa Park, CA
- – Rv Roof Repair Near Me Villa Park, CA
- – OCRV Center
Roof Repair For Rv Villa Park, CA
Think about making use of a liquid roofing system covering: Cover up off areas not to be coated. Mix and pour the coating equally across the roof.

Tidy every 3-6 months, depending on usage and storage space. Avoid vehicle parking under trees where arm or legs and sap can harm the roofing system. While numerous Recreational vehicle roof covering repairs can be Do it yourself jobs, some situations require expert aid: Structural damage or major roofing drooping Large, hidden leakages that are difficult to trace Full membrane layer replacement Insurance-related repairs Learning exactly how to perform a RV roof repair encourages you to shield your financial investment, save cash, and prevent mid-trip calamities.
Rv Roof Maintenance Villa Park, CA
If you do not evaluate, reseal, and repair your recreational vehicle roof consistently, you will wind up with some beautiful awful water damage. This is something that will quickly reduce the worth of your motor home and can even provide it pointless. Taking care of your Motor home roof covering is something you can probably do all on your own.
After about ten years, it will also be necessary to reseal the entire roof (Villa Park Rv Rubber Roof Replacement). To do this, you'll require to climb up onto the roof, yet be very cautious when you do.
Next off, you'll wish to clean your roofing system completely, so as to get rid of any dust fragments. You can use a long dealt with brush for this, but never ever utilize a cleaner that contains petroleum solvents or citrus ingredients on your rubber or vinyl roofing system. These kinds of cleaners will create long-term damages to the surface.
Rubber Roof Installation Villa Park, CA
While you're cleansing, remove any kind of particles or old roofing system material, yet beware while you do this as you might quickly elongate a tear, and even punch a hole via the roof. You should then dry the roof as best as you can. Note: Rubber recreational vehicle roofings can be really unsafe when wet.

After the roof covering is clean, you are mosting likely to wish to evaluate the joints for openings, splits or peeling off, so you can reseal wherever needed. In addition to that, you'll intend to challenge resealing all joints when a year whether or not they show indications of wear.
When it comes to picking the most effective recreational vehicle roofing system sealer, you'll wish to consider whether you are fixing a tear, resealing a seam, or sealing the whole roofing. The sort of roof covering is also important to bear in mind, as motor home roof coverings can be made from either EPDM (Ethylene Propylene Diene Monomer) and TPO (Thermal Polyolefin) and you require the product you use to be suitable with your roofing system kind.
Rv Roof Replacement Villa Park, CA
Dicor Self-Leveling Lap Sealer is an excellent option for looking at old roof seals. It can be utilized for spot sealing or to reseal every joint on the motor home roofing. Simply cleanse the location well and use with a caulk weapon. Right stuff will certainly level itself out, so do not worry concerning that part.
This tops and layers the roofing to produce a wonderful, protective finishing that'll last for years. Lastly, there is the Dicor TPO Roof Covering Layer System. Similar to the EPDM system noted above, this covering product will cover your TPO roof covering and help it last an additional 10 years. Prior To EPDM and TPO, steel was the product of selection for RV roofings.
The aforementioned EternaBond is still king when it comes to fixing small problems on a steel roofing. RV steel roofings do need to be absolutely resealed from time to time.
Rv Trailer Roof Repair Villa Park, CA
Dicor Self-Leveling Lap Sealer works well for this work. You'll require to eliminate the existing roof covering.
Get rid of the vent fans, skylights, and AC unit. Peel the present layer of rubber back until you see the plywood structure beneath. Examine plywood for rot, bowing, mold, or splintering. Replace damaged pieces. Once the plywood prepares, it's ideal to cleanse the plywood with something like mineral spirits to get rid of any kind of kind of debris.
Do this in small portions the whole time the roof, reducing openings in the rubber roof for any kind of feature that will return into the roofing system. Ultimately, change your roofing's fans, skylights, and air conditioning unit. Seal each joint with the lap sealer we stated earlier. You'll also desire to use lap sealer to the sides of the roof covering.
Rubber Roof Installation Villa Park, CA
In this message, we intend to show you just how to DIY recreational vehicle roofing system repair. Staying in a recreational vehicle has fantastic moments, however things also fail. Knowing how to DIY a great deal of the things that can damage or ruin will conserve you not just a lot of cash on recreational vehicle repair services but might also conserve you a great deal of prospective time in the store! This article may contain associate web links.
I might receive a small compensation when you purchase utilizing my web link. Review our Please Note Policy for even more info. We attempt to prepare our paths very carefully to stay clear of low-hanging items over the road. Often, however, we discover ourselves in unexpected scenarios. This is how we wound up with a couple of small rips on the roofing system of our motor home.
We believed we were free from the branches, however we wound up catching a few of them on the far left side of the roofing. There were an overall of 4-5 tiny openings in the side of the roof. We didn't inspect the roof because we didn't believe we hit anything.
Rubber Roofing For Rv Villa Park, CA
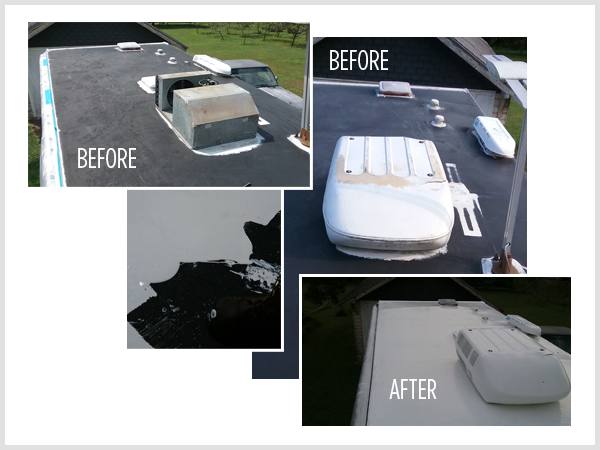
Among the rips in our RV roofing A couple of weeks later, we endured an extreme thunderstorm and a great deal of rainfall. Throughout the tornado, we located that we had a percentage of water leaking through one of the lighting fixtures in the bathroom. Thankfully, we did not finish up with any type of irreversible water damages.
He covered it as best he might with heavy-duty gorilla tape and afterwards bought the materials needed to do a motor home roof covering repair work. The EPDM rubber roof covering material that a lot of Recreational vehicles feature is normally rather challenging regarding roofing products go. Rubber roofs last for many years, but they do tear if caught hard enough.
Rubber Roof Installation Villa Park, CA
In our situation, this indicated removing the gorilla tape that we had actually made use of as a momentary solution while we waited on the products we bought to get here. You'll intend to cleanse the location around the tear that you will be covering well. This enables the spot to correctly adhere and will certainly prevent future leakages.
To cleanse the roofing, utilize scrubing alcohol and either a dustcloth or paper towels., which is a Recreational vehicle roof repair service tape.
You will want to measure out just how much you require and cut an item as necessary. Remove the support and apply thoroughly over the tear in the roof. Once it has actually touched the roofing system, it adheres pretty swiftly, so you'll wish to see to it and setting it right the very first time.
Rv Roof Replacement Villa Park, CA
Press securely and remain to rub it and ravel the patch for a number of minutes. Utilizing a caulk weapon, coat the entire spot with Dicor 501LSW-1 Epdm Self-Leveling Lap Sealant. This rubber sealant produces a safe additional seal on your rubber roof and makes certain that the leak is appropriately secured.
There are a lot of Dicor motor home roof covering repair work items that you can get including roof coatings, roof covering sealer, and a lot more for the surface area of your roof covering. Using the Dicor lap sealant Start on the edges and work your way around the entire spot, filling out the center as you go.
Clean any excess off and don't permit it to run down too far. This is a self-leveling sealant so you must finish up with a rather level patch. According to the supplier, it will be water-proof in 4 hours, 80% cured in two days, and 100% cured in thirty days.
To change an entire RV roofing system with significant damages would result in a lot more expensive repair work. I really hope that you have actually located the details in this post helpful. Be certain and pin this article for future recommendation in situation you could require it in the future! To avoid RV roofing problems, inspecting your roofing system regularly during recreational vehicle maintenance is a good idea.
Replace Rv Roof Villa Park, CA
Your recreational vehicle is a home on wheels, whether for several days each time or throughout the year. Like a home, the water supply can leakage, such as the fresh water storage tank or the hot water heater. A RV is also a lot more at risk to specific leaks, such as in the roofing, because it is mobile and has a more lightweight style than your home.
Your Recreational vehicle is a considerable financial investment. Below are a few reasons evaluations and repair work matter: When you check your Recreational vehicle routinely, you can catch problems like leakages before they cause considerable damages to your interior.
Rv Roof Leak Repair Near Me Villa Park, CA
Water dripping from the air conditioning unit outside the RV is typical during procedure. The water needs to follow a specific path down the networks on the roofing that lead it to either the forward or aft corner of the rig. If you see water trickling inside or dripping in an additional area outside, that might represent a concern with the system.
Plumbing leakages can show up in the storage space compartment. Often, water damage presents noticeable signs, yet you might not notice it right away in various other instances. Here are a couple of things to look out for: Mold and mold development Noticeable water discolorations or rust Pools or wet places Undesirable scents Flaking paint or aluminum Squeaky, soft or twisted walls or floors Distorted or misshapen wood cupboards or trim Condensation on windows or inside cupboards Water damages or condensation in your recreational vehicle can trigger numerous unsafe results.
Rv Trailer Roof Repair Villa Park, CA
Before you begin the procedure of camper leak repair service, you need to discover the resource. Adhere to these steps to recognize the leak's beginning point: Examine the roof, walls, ceilings and doors to find any locations with used or broken seals and caulking.
Run water via the faucets and inspect for leaking water at the links. Check out wastewater and freshwater systems for splits or leaks in the storage tanks, links and hoses.
Rv Roof Repair Near Me Villa Park, CA
OCRV Center
Address: 23281 La Palma Ave Yorba Linda, CA 92887Phone: (714) 909-1444
Email: [email protected]
OCRV Center
Spray specific areas while somebody else stands inside the camper to see where water obtains in. A flashlight illuminates the space for a lot more effective examination in cramped, dark locations like cupboards and plumbing components. This gadget connects to hoses to inspect for abnormal pressure drops that may show a leak.
Rv Trailer Roof Repair Villa Park, CAEpdm Rv Roof Repair Villa Park, CA
Rv Slide Out Roof Repair Villa Park, CA
Rv Slide Out Roof Repair Villa Park, CA
Rv Trailer Rubber Roof Repair Villa Park, CA
Rv Rubber Roof Replacement Cost Villa Park, CA
Replace Rv Roof Villa Park, CA
Motorhome Roof Replacement Villa Park, CA
Rubber Roof For Rv Villa Park, CA
Rubber Roofing For Rv Villa Park, CA
Roof Repair For Rv Villa Park, CA
Rv Slide Out Roof Repair Villa Park, CA
Rv Roof Leak Repair Near Me Villa Park, CA
Resealing Rv Roof Villa Park, CA
Best Rv Roof Repair Villa Park, CA
Rv Roof Leak Repair Near Me Villa Park, CA
Rubber Roof For Rv Villa Park, CA
Rv Trailer Rubber Roof Repair Villa Park, CA
Rv Roof Repair Villa Park, CA
Rubber Roof For Rv Villa Park, CA
Epdm Rv Roof Repair Villa Park, CA
Repair Rv Roof Leak Villa Park, CA
Rv Rubber Roof Replacement Villa Park, CA
Rubber Roofing For Rv Villa Park, CA
Resealing Rv Roof Villa Park, CA
Rv Roof Replacement Villa Park, CA
Rubber Roof Installation Villa Park, CA
Rv Rubber Roof Maintenance Villa Park, CA
Rv Roof Leak Repair Near Me Villa Park, CA
Rv Rubber Roof Replacement Villa Park, CA
Epdm Rv Roof Repair Villa Park, CA
Roof Repair For Rv Villa Park, CA
Rv Roof Maintenance Villa Park, CA
Class C Rv Roof Repair Villa Park, CA
Replace Rv Roof Villa Park, CA
Roof Repair For Rv Villa Park, CA
Rubber Roof For Rv Villa Park, CA
Rv Trailer Rubber Roof Repair Villa Park, CA
Repair Rv Roof Villa Park, CA
Epdm Rv Roof Repair Villa Park, CA
Replace Rv Roof Villa Park, CA
Rv Trailer Roof Repair Villa Park, CA
Rv Slide Out Roof Repair Villa Park, CA
Rv Roof Replacement Villa Park, CA
Rv Roof Maintenance Villa Park, CA
Best Rv Roof Repair Villa Park, CA
Epdm Rv Roof Repair Villa Park, CA
Rubber Roofing For Campers Villa Park, CA
Motorhome Roof Replacement Villa Park, CA
Class C Rv Roof Repair Villa Park, CA
Rv Roof Repair Fiberglass Villa Park, CA
Rv Rubber Roof Repair Villa Park, CA
Rv Trailer Rubber Roof Repair Villa Park, CA
Rubber Roofing For Rv Villa Park, CA
Best Rv Roof Repair Villa Park, CA
Motorhome Roof Replacement Villa Park, CA
Rubber Roofing For Rv Villa Park, CA
Class C Rv Roof Repair Villa Park, CA
Rubber Roof For Rv Villa Park, CA
Rv Roof Repair Fiberglass Villa Park, CA
Rv Roof Leak Repair Villa Park, CA
Motorhome Roof Replacement Villa Park, CA
Repair Rv Roof Leak Villa Park, CA
Rv Slide Out Roof Repair Villa Park, CA
Best Rv Roof Repair Villa Park, CA
Rv Rubber Roof Maintenance Villa Park, CA
Roof Repair For Rv Villa Park, CA
Rv Rubber Roof Repair Villa Park, CA
Rv Roof Repair Fiberglass Villa Park, CA
Rv Roof Leak Repair Villa Park, CA
Rubber Roofing For Campers Villa Park, CA
Rv Roof Repair Villa Park, CA
Roof Repair For Rv Villa Park, CA
Rv Trailer Roof Repair Villa Park, CA
Rv Trailer Roof Repair Villa Park, CA
Replace Rv Roof Villa Park, CA
Rv Fiberglass Roof Repair Villa Park, CA
Replace Rv Roof Villa Park, CA
Near Top Seo Company Villa Park, CA
Near Here Top Seo Company Villa Park, CA
Rv Rubber Roof Replacement Villa Park, CA
OCRV Center
Table of Contents
- – Roof Repair For Rv Villa Park, CA
- – OCRV Center
- – Rv Roof Maintenance Villa Park, CA
- – Rubber Roof Installation Villa Park, CA
- – Rv Roof Replacement Villa Park, CA
- – Rv Trailer Roof Repair Villa Park, CA
- – Rubber Roof Installation Villa Park, CA
- – Rubber Roofing For Rv Villa Park, CA
- – Rubber Roof Installation Villa Park, CA
- – Rv Roof Replacement Villa Park, CA
- – Replace Rv Roof Villa Park, CA
- – Rv Roof Leak Repair Near Me Villa Park, CA
- – Rv Trailer Roof Repair Villa Park, CA
- – Rv Roof Repair Near Me Villa Park, CA
- – OCRV Center
Latest Posts
Evaporative Cooler Rust Repair Alhambra
Home Hvac Maintenance Alhambra
Air Conditioner Maintenance La Canada Flintridge
More
Latest Posts
Evaporative Cooler Rust Repair Alhambra
Home Hvac Maintenance Alhambra
Air Conditioner Maintenance La Canada Flintridge