All Categories
Featured
Table of Contents
- – Rv Blinds Repair West Covina, CA
- – OCRV Center
- – Rv Blinds Repair West Covina, CA
- – Rv Furnace Repair West Covina, CA
- – Rv Awning Fabric Repair West Covina, CA
- – Rv Electrical Repair Near Me West Covina, CA
- – Repair Rv West Covina, CA
- – Rv Repair Shop West Covina, CA
- – Rv Repair Reviews West Covina, CA
- – Rv Electrical Repair Near Me West Covina, CA
- – Rv Refrigerator Repair West Covina, CA
- – Rv Repair Near Me West Covina, CA
- – Rv Blinds Repair West Covina, CA
- – Rv Awning Repair West Covina, CA
- – OCRV Center
Rv Blinds Repair West Covina, CA
Quality based floor covering, wall surfaces, and siding are a must. It is very crucial that you pick the right and a top quality product in the production of your house siding.
Being fairly economical and pocket-friendly, aluminum house siding comes with a low upkeep also. The aluminum home siding has actually been one of the earliest and most reliable systems of all time.
Rv Blinds Repair West Covina, CA
The light weight aluminum home siding for a RV shows up with an exact fit and makes up of modern high-strength product. This aluminum exterior siding system meets a selection of needs and layout specifications.
We use special order RV light weight aluminum siding with a number of personalization alternatives. To be ideal for the aesthetic top quality, there are a variety of color alternatives offered to make your rv opt for the pattern. There are options readily available in the pattern and layout too, including 3" Mesa, 4" Mesa, 4" Mesa 1 with Reverse, Yoder and far more.
Something that advantages some explanation or expedition is what I suggested to say outside of the camper is this piece of trim right here. It was undoubtedly added somehow and caulked badly. I'm gon na take all of this off. I wan na look underneath there, see what inspired someone to put that on to begin with, and after that simply dual check to make certain there aren't any type of still existing conditions under there that require to be dealt with.
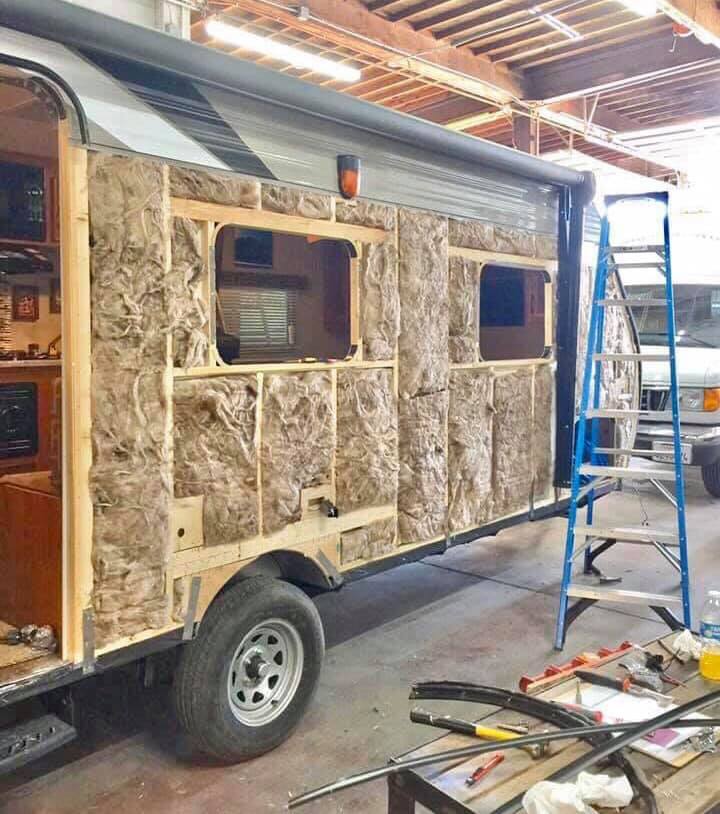
Here we go. I have actually obtained all the screws out, there were concerning a bazillion of them. And currently I'm functioning on this caulk, and the lesson out of this is slice do not tear. I am doing the job with a level bar, but the key to this is to use it like that, to cut the caulk complimentary.
Rv Furnace Repair West Covina, CA
You don't want anything sharp going against that aluminum skin 'cause there's an opportunity you can permeate it and you're gon na develop a larger trouble. Obtain in there. And when I have actually obtained that caulk sliced, after that I'll be able to take this corner off and we'll see what's under there.
I have actually obtained this peeled off to a point where this is all set to come off and look at inside there. It's gon na take a little expedition perhaps from within in order to figure out specifically how to deal with this top edge.
Remember, inside right here, every one of this floor got replaced, and what I came to identify is that that was the trouble. At one point, the camper had a leakage being available in with there. Someone attempted to do some repair work, but the bottom line is I need to open this up to get that component repaired.
Rv Awning Fabric Repair West Covina, CA
One, I've marked on the wall surface where I wan na make cuts in order to open this edge. And at this phase of the game, this is sort of like exploratory surgical treatment. I wan na essentially do just feasible very first just to see what's going on here. And afterwards, if I need to open up the wall surface some extra, I will, however I would instead refrain from doing that.
I marked that as a straight line because I'm gon na reduce it right as I can which's gon na make it simpler to spot back in. If you just enter here with a jigsaw or a Sawzall or something and cut it willy-nilly, then I believe it's gon na make it tougher to get brand-new panels put back into this.
It's a cordless saw and it enables me to establish the deepness to reduce so I recognize I'm gon na simply barely pass through that paneling. That's gon na quit me from cutting things I don't wan na cut on the other side of the wall.
Rv Electrical Repair Near Me West Covina, CA
Spoken about in this manner when with the floor. We don't understand what we're gon na obtain at inside there. We recognize it's gross. Far better to secure on your own and not be taking a breath that junk in as we go. So at this stage of the game, we can discharge things up and, I do not know, begin opening it up and see what's got ta happen next.
The poor piece that we can see from the outside is actually behind below. It's actually great to see that this framing right here is still very strong. We do not have any kind of rot there. To make it a little less complicated to get to this and likewise just to obtain rid of this item, I'm gon na cut this panel back a bit much more.
Repair Rv West Covina, CA
I'm gon na reduce a little, and a little bit and a bit, primarily, I'm searching for the element where this gets solid once again much like when I did the floor, it was the exact same idea of, exactly how far back do we have to take it to obtain to great stuff? I'm gon na mess with that.
That additional cut, bringing this back, obtained me to where I located wood that's solid, so that's awesome. There's not a whole lot of complex stuff going on below.
Rv Repair Shop West Covina, CA
The lower line out of this is anything that looks hinky is concerning to come out of right here and after that come back and rebuild this with new framework stuff that'll allow this edge go back with each other well. Now, when you do this, if you make use of a multi-toll, whatever you use to make these cuts you wan na be truly cautious
You're just gon na have to be very, really careful as you go through to make sure you do not go through. Experience the product, not undergo the panel on the camper. I prepare to reduce this one and what I've done is utilized a square to mark that line.
Rv Repair Reviews West Covina, CA
That worked out truly well and obtained that flush cut. It's ready to receive a new cross participant in there and I'm gon na repeat that process and just, like I claimed, get all the old junk out of right here. The reconstruct on the corner below is going truly well and second best concerning the lumber here.
You can conversely simply get 2 by 2 also. And, as I put whatever together, as I've stated previously, among the important things I'm doing because I can't get to the outdoors to bring screws from the outside in to the end grain of this piece, or here, I could not obtain in this means, so instead it's the edge irons that are making this work to make sure that I can tie every little thing with each other.
Rv Electrical Repair Near Me West Covina, CA
This portion of 2 by six lives right below and what it truly does, gets on the outside, this is the reduced end of the support that stands up the front awning. So this piece's function in life is to live right below and receive the screws on that particular support.
Screws I'm using are just common inch and 5/8 wood screws and driving those with the charge vehicle driver. The impact wrench, impact motorist, makes a truly large offer on that particular and it makes stuff go a lot much faster. From here on out, it's rinse and repeat, any various other location that are blocks like this, put those in.
With the fixings done on the inside we're simply around to a point where we can obtain new trim on the exterior of the camper, however, before we can place new stuff on we obtained ta get old stuff off. There is a great deal of deposit right here that's remaining from the trim that got on there.
Rv Refrigerator Repair West Covina, CA
Getting old caulk off, particularly recreational vehicle caulk, is hard to do, however, I have actually obtained a strategy for this using a multi-tool that makes this rather straightforward, rather basic. First off, allow's have a look at the multi-tool and what we require, that pointer, not a cutter, however what kind of idea we require in that multi-tool to work on this.
And I have actually located that a multi-tool is a truly, actually great way to do this. You've seen me use the multi-tool in various other places on the camper, reducing wood out, cutting nails. Now, in this case, we do not wan na cut with it we wan na press with it. This ends up being essentially a putty blade on steroids.
Rv Repair Near Me West Covina, CA
Think of, if you could get a putty knife, if you did obtain a putty knife up against that caulk and you were pushing versus it, but like a billions times a min, that's what we're gon na do with this. For what we're doing, we don't want a saw blade on here.
What I'm gon na do is start by knocking the teeth off. I'm gon na make this a little convex, and then I'm gon na sharpen it simply a little, it does not have to be a blade side, but just envision what the pointer of a putty knife looks like. That's all we desire this to appear like when we're done.
Currently we can go after that caulk. Rv Electrical Repair Near Me West Covina. Since we have the right tool for the job, we can begin going after this caulk and component of the trick to this is when you can be found in with a multi-tool, this is more challenging than the light weight aluminum. Do not come in at a genuine steep angle.
Rv Blinds Repair West Covina, CA
And it's just gon na refer discovering the best angle, finding the appropriate angle, and after that slicing, slicing, slicing, up until you obtain all of that residue off of there like this. Well, there you go, you understand, and for me, there's whole lots more of this to do, so thankfully, thank benefits it's as very easy as it is with the multi-tool.

Be careful of your substratum. Ensure that the tool is not gon na damage the substrate when you're servicing obtaining this caulk off below. I just obtained ta obtain back to it and obtained this whole corner to go. Our last action in cleansing up caulk residue and various other scrap below on the camper is to use a cord wheel and a drill.
Now, once more, like I have actually discussed previously, before you do this, see to it that whatever location you're tidying up can hold up against the roughness of a cable wheel being run over it. It works fantastic on this aluminum skin. Would not be a great selection for any kind of type of a membrane, yet essentially we simply wan na scrub below and it's gon na knock off this junk that really did not come off from the previous step, such as this.
Rv Awning Repair West Covina, CA
Actually what we wan na do below is ensure that if you're utilizing this maintain it moving like that. Don't simply float in one spot 'cause we can get friction from this and we do not wan na burn the paint that's left on below. I have actually obtained ta a piece of trim and it's ready, yet we're not really setting up the trim now.
OCRV Center
Address: 23281 La Palma Ave Yorba Linda, CA 92887Phone: (714) 909-1444
Email: [email protected]
OCRV Center
So what I'm gon na do is attach this item on temporarily. I'm gon na develop the corner and after that take it withdraw and we got ta enter into a whole caulking step right here. At this phase of the game, here's what this is gon na look like. I'm gon na get this in place like that.
Rv Repair Near Me West Covina, CARv Repair Near Me West Covina, CA
The Rv Repair Centre West Covina, CA
Motorhome Repair Shops Near Me West Covina, CA
Rv Blinds Repair West Covina, CA
Motorhome Roof Repair West Covina, CA
Repair Rv West Covina, CA
Rv Furnace Troubleshooting West Covina, CA
Rv Electrical Repair West Covina, CA
Motorhome Repair Shops Near Me West Covina, CA
Repair Rv Awning West Covina, CA
Rv Repair Near Me West Covina, CA
Rv Furnace Repair Near Me West Covina, CA
Rv Refrigerator Repair West Covina, CA
Rv Ac Repair Near Me West Covina, CA
Replacement Rv Awning West Covina, CA
Rv Electrical Repair West Covina, CA
Local Rv Repair West Covina, CA
Rv Awning Fabric Repair West Covina, CA
Motorhome Repairs West Covina, CA
The Rv Repair Centre West Covina, CA
Rv Fridge Repair Near Me West Covina, CA
Motorhome Mechanic Near Me West Covina, CA
Rv Awning Fabric Repair West Covina, CA
Motorhome Repairs West Covina, CA
Rv Electrical Repair West Covina, CA
Motorhome Roof Repair West Covina, CA
Rv Furnace Repair Near Me West Covina, CA
Rv Electrical Repair Near Me West Covina, CA
Rv Awning Repair West Covina, CA
Rv Furnace Repair West Covina, CA
Rv Fridge Repair Near Me West Covina, CA
The Rv Repair Centre West Covina, CA
Rv Refrigerator Repair West Covina, CA
Rv Water Damage Repair West Covina, CA
Recreational Vehicle Repair West Covina, CA
Rv Repair Shop West Covina, CA
Local Rv Repair West Covina, CA
Rv Fridge Repair Near Me West Covina, CA
Replacement Rv Awning West Covina, CA
Repair Rv Awning West Covina, CA
Rv Repair Near Me West Covina, CA
Rv Ac Repair Near Me West Covina, CA
Rv Awning Repair Near Me West Covina, CA
Rv Awning Repair Near Me West Covina, CA
Rv Electrical Repair Near Me West Covina, CA
Repair Rv West Covina, CA
Rv Awning Repair Near Me West Covina, CA
Rv Furnace Troubleshooting West Covina, CA
Motorhome Repair Shops Near Me West Covina, CA
The Rv Repair Centre West Covina, CA
Repair Rv Awning West Covina, CA
Rv Specialists West Covina, CA
Rv Ac Repair Near Me West Covina, CA
Rv Repair Reviews West Covina, CA
Awning Repair Rv West Covina, CA
Rv Electrical Repair West Covina, CA
Motorhome Mechanic Near Me West Covina, CA
Rv Electrical Repair West Covina, CA
Rv Repair Reviews West Covina, CA
Motorhome Repairs West Covina, CA
Rv Specialists West Covina, CA
Local Rv Repair West Covina, CA
Rv Repair Shop West Covina, CA
Rv Fridge Repair Near Me West Covina, CA
Rv Furnace Repair Near Me West Covina, CA
Local Rv Repair West Covina, CA
Rv Repair Reviews West Covina, CA
Rv Water Damage Repair West Covina, CA
Rv Aluminum Siding Repair West Covina, CA
Replacement Rv Awning West Covina, CA
Replacement Rv Awning West Covina, CA
Awning Repair Rv West Covina, CA
Rv Refrigerator Repair West Covina, CA
Rv Electrical Repair West Covina, CA
Rv Repair Near Me West Covina, CA
Motorhome Repairs West Covina, CA
Rv Refrigerator Repair West Covina, CA
Finding A Good Local Seo Package West Covina, CA
Find Seo Citations West Covina, CA
Rv Electrical Repair Near Me West Covina, CA
OCRV Center
Table of Contents
- – Rv Blinds Repair West Covina, CA
- – OCRV Center
- – Rv Blinds Repair West Covina, CA
- – Rv Furnace Repair West Covina, CA
- – Rv Awning Fabric Repair West Covina, CA
- – Rv Electrical Repair Near Me West Covina, CA
- – Repair Rv West Covina, CA
- – Rv Repair Shop West Covina, CA
- – Rv Repair Reviews West Covina, CA
- – Rv Electrical Repair Near Me West Covina, CA
- – Rv Refrigerator Repair West Covina, CA
- – Rv Repair Near Me West Covina, CA
- – Rv Blinds Repair West Covina, CA
- – Rv Awning Repair West Covina, CA
- – OCRV Center
Latest Posts
Evaporative Cooler Rust Repair Alhambra
Home Hvac Maintenance Alhambra
Air Conditioner Maintenance La Canada Flintridge
More
Latest Posts
Evaporative Cooler Rust Repair Alhambra
Home Hvac Maintenance Alhambra
Air Conditioner Maintenance La Canada Flintridge