All Categories
Featured
Table of Contents
- – Travel Trailer Replacement Windows Corona, CA
- – OCRV Center
- – Trailer Floor Repair Corona, CA
- – Trailer Windows Replacement Corona, CA
- – Trailer Floor Repair Corona, CA
- – Rv Travel Trailer Repair Near Me Corona, CA
- – Travel Trailer Roof Replacement Corona, CA
- – Travel Trailer Siding Repair Corona, CA
- – Fifth Wheel Repair Near Me Corona, CA
- – Horse Trailer Repairs Corona, CA
- – Travel Trailer Ceiling Repair Corona, CA
- – Fifth Wheel Repair Near Me Corona, CA
- – Trailer Awning Replacement Corona, CA
- – Rv Trailer Repair Shop Corona, CA
- – OCRV Center
Travel Trailer Replacement Windows Corona, CA
Motor homes provide fun, enjoyment, and lots of adventurous possibilities. For all that they have to provide, they call for routine focus in the form of maintenance and maintenance to keep them looking and functioning at their prime for as long as feasible. Among the most vital points to keep an eye out for with camper trailers and Recreational vehicles is water damage, as these cars by their actual nature are typically exposed to the aspects.
If water intrusion has triggered the wood framing of your motor home or camper to splash, then you'll require to enable it to fully dry out before covering it back over with timber flooring. Permit for open-air drying of framing materials for at the very least a week and afterwards use a mold-killing item such as a borax remedy to remove future rot problems in the same location.
That claimed, it is very essential for mounting products to be completely dried out before doing this or else you run the risk of developing a kind of shell that encourages rot in the timber beneath the seal. Enable three to 4 days for epoxy material to totally treat. Since you've made sure to entirely dry out and protect the mounting against future water breach, you can set out brand-new flooring.
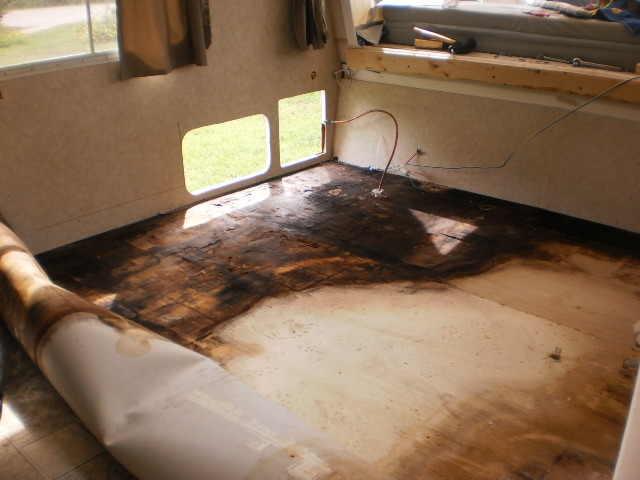
I spent a few hours combing this discussion forum for information that would aid me in replacing 2 considerable flooring areas in my 2011 MPG 181. Like I've read numerous of the customers did right here, I bought a traveling trailer that had concerns that I must have been able to detect and take into consideration in my acquisition.
Trailer Floor Repair Corona, CA
I have not begun tearing right into the flooring yet as I want to seek and extinguish out the leakages initially to minimize further water damage. Very little sense in replacing a floor that will certainly just obtain damp again in the following rain or trip through a rainstorm. I did get some fantastic details herein particular to what might be dripping and just how to test for and repair the leaks.
Anyway, any assistance or guidance would be significantly appreciated. I do intend on taking pictures and uploading them throughout this task to show those that may be in the same boat, or in this instance,, robo.
Determine sections exhibiting indicators of water damages, bending, or any type of various other issues. This preliminary assessment is crucial for leading you in the succeeding repair service actions by helping you identify the details materials and devices needed. By completely examining the condition of the floor covering, you can make educated choices concerning the extent of the repairs and ensure that you are appropriately prepared.
Trailer Windows Replacement Corona, CA
Take the time to extensively evaluate and examine the damage before embarking on the fixings to achieve much more effective and effective results. After assessing the extent of the damage, acquire the essential products and devices. Regular products for fixing traveling trailer flooring encompass plywood, plastic, or laminate flooring, adhesive, and sealant.
This cautious prep work makes certain that the repair job can be carried out with accuracy and without barrier from any unneeded products or obstructions. Employ a circular saw or jigsaw to meticulously get rid of the compromised parts of the floor covering. Implement specific cuts to guarantee a smooth assimilation with the substitute materials.
Trailer Floor Repair Corona, CA
Be diligent in making use of the cutting devices to maintain accuracy throughout the procedure, guaranteeing that the new materials fit snugly right into place. This accuracy is important for the general success of the repair, boosting the toughness and aesthetic communication of the recovered flooring. Give unique factor to consider to areas with water damage, as thorough and accurate cutting in these areas is essential for avoiding any type of potential concerns down the line.
Complying with the conclusion of the repair work, make certain correct air flow for your travel trailer. Open windows and doors to facilitate the blood circulation of fresh air, speeding up the drying out process and lowering the possibility of mold or mold formation. Allowing ample air movement is essential to advertising a healthy environment within the trailer, minimizing the danger of moisture retention.
After the mended flooring has actually completely dried out and healed, bring back your furniture and design into the traveling trailer. Seize this minute to rearrange and revitalize the inside, crafting an inviting room for your future adventures. With the repaired floor covering giving a secure foundation, maximize this opportunity to improve the layout and appearances of your trailer.
A trustworthy repair service can guarantee that your travel trailer is outfitted to stand up to the varied climate conditions Michigan presents, from cold wintertimes to cozy summer seasons. Investing time and initiative into the repair work procedure is a financial investment in the longevity of your travel trailer, ensuring it stays a trusted buddy on your Michigan adventures.
Rv Travel Trailer Repair Near Me Corona, CA
Conserve yourself some time and trouble and let the pros at RV Roofing system Fixing Florida replace your motor home floor covering. However, if you would love to do it on your own, we've got a couple of suggestions to make the process go smoother. Often, we see Recreational vehicles with 20-year-old carpeting, vinyl, or linoleum. Removing rug isn't all that difficult, however it's time consuming to select out the staples.
These tack strips cover the border of your train. When carpeting is set up, it's put on one tack strip and after that stretched to the contrary wall. Cut a slit in the carpeting and after that begin pulling up so it divides from the strips to tear it out. When the rug is pulled up, roll it up, and remove it from the coach.
Travel Trailer Roof Replacement Corona, CA
It's heavier than you think. You might need 2 individuals to raise it. If you come across discolorations on your rug, hold your breath when you're pulling. Gritty dirt runs away; sometimes it's dried out family pet urine. Now, if your train has a slide out, it's going to be a lot more challenging. Several older Motor homes have quit that go the whole way out whereas more recent ones have leave appear and then make the flooring flush.
If you desire to keep going at it on your own, after that pry up the tack strips and staples. If you don't get them all, you'll have bumps under your flooring.
Travel Trailer Siding Repair Corona, CA
That occurs with peel and stick flooring ceramic tiles. You'll find staples in every edge of your trainer and your hands and fingers will be sore from pulling them all up. After they're full blast, move or vacuum cleaner up the particles and double check for staples you missed the very first time.
It's crucial to make sure that the flooring is smooth, tidy and there's no shiny paint left behind. Otherwise the flooring may not stick.
If you're not certain how to shim that, luan makes a great choice. It's likewise vital to seal your bathroom location well. As you know, water makes wood and wood laminate swell and contract - Corona Travel Trailer Service. It's also better to make certain that when you're ready to install the brand-new floor covering that you offer it time to relax in the natural surroundings.
Fifth Wheel Repair Near Me Corona, CA
Currently that you're prepared to place in the brand-new floor, make certain it matches the inside. They put down the brand-new flooring just to find their better fifty percent doesn't like the color due to the fact that it does not match the interior therapies.
Decide where you want the new flooring and gauge it. Make certain you have the best color, pattern, size and measurements. From there, select a line that's square and set a chalk line so you obtain it wonderful and straight. It's tough due to the fact that lines aren't constantly square. Currently begin laying the drifting floorings one-by-one.
It's finest to notch the floor covering and make certain you cut about door jams prior to you lay it down. If you're installing drifting floorings, you must recognize they might be bolted down on one side and then drift above the subfloor.
The flooring is laid, make sure to cut it out so it looks finished. Now that you recognize all the steps included in laying Recreational vehicle floor covering, do you really want to invest your weekend doing untidy, filthy job?
Horse Trailer Repairs Corona, CA
A pal's camper has actually been leaking for a long time apparently and has deteriorated out the floor, journal and joists. The local camper sales/service area wanted $200 ...
Determining factors include dimension, floor option, slide-out(s), and pre-existing damages beneath, and so on. Units without slide-outs will take around 20 to 60 labor hours ($4,000.00 $12,00.00). Please note: this rate does include the cost of materials and store products. Slide-outs: 8 to 16 added labor hours ($1,600.00 $3,200.00). Please note: this price does consist of the price of products and shop materials.
Travel Trailer Ceiling Repair Corona, CA
Motor home furniture is bolted in area. That furniture will remain inside, and our specialist will certainly relocate it from one side of the system to the various other as they work.
These things have to be eliminated and reinstalled really thoroughly. If we were to harm these items, we probably can not order a replacement. Recreational vehicle carpet is NOT set up like a residence with a tack strip. Your rug is either glued down OR it's stapled in position with hundreds of staples (essentially, thousands) that require to be gotten rid of one by one.
Fifth Wheel Repair Near Me Corona, CA
Your new floor choice is a big determining factor in your overall labor expense. It is much less time eating for our service technicians to set up rug or linoleum than it is to set up a hardwood/laminate floor covering that calls for a technician to reduce each plan, individually. There is also preparation job you can add to that saves our service technicians time.

***DO NOT EFFORT ANY PREP WORK PRIOR TO A CONSULTATION. IF PREPARATION FUNCTION IS NOT COMPLETED CORRECTLY, IT MAY CAUSE ADDITIONAL LABOR HOURS FOR OUR SERVICE TECHNICIANS **Please call (209) 263-7040 and schedule a motor home Floor covering Appointment. The examination sets you back $200.00. This will be credited to your RV Floor Replacement task when reserved.
A couple of points to think about are the layout of your room, the condition of your subfloor, and the degree of difficulty to mount your chosen pattern. Armstrong has a acrylic cement that withstands fracturing, stains, and continues to be flexible during use and in travel. If you desire comfort that your flooring is mounted appropriately, we recommend having a professional floor covering installer.
Your recreational vehicle, motorhome, camper or trailer has actually been your trusted friend on plenty of adventures, however it likewise lugs the scars of its journeys. These could be in the type of water damages, rot, or basic wear and tear on the recreational vehicle flooring. Evaluating the level of this damages is the first action towards your destination of a perfectly remodeled vehicle.
Trailer Awning Replacement Corona, CA
The visibility of mold or mildew is one more dead giveaway of water damage. Bear in mind, capturing these concerns early is like identifying a minor problem throughout a routine lorry assessment. It enables you to deal with the issue before it intensifies right into a major fixing. Make the effort to check your existing setup to, as an example, know if you need to replace decomposed timber floor covering.
You should not utilize underlayment with any of these options as you can just utilize a floating flooring or adhere directly to the plywood. Laminate floor covering resembles the all-terrain car of the floor covering worldit's functional, cost-effective, and very easy to mount. It's a prominent option amongst motor home owners thanks to its light-weight nature and the fact that it simulates the appearance of wood floor covering.
If you're considering this option, you'll require to secure it from water damage, particularly if you have pets or kids. If you're trying to find a floor covering option that's durable, water-resistant, and simple to clean, vinyl plank floor covering may be your ideal wager. This is a versatile, functional alternative because it withstands the aspects and is developed to last.
Rv Trailer Repair Shop Corona, CA
With your tools, products and strategy in place, it's time to roll up your sleeves and study the meat of this job: removing the old motor home floor covering. This process can differ depending upon the kind of flooring you're managing. Vinyl floor covering, carpet, and wood floor covering each need a various technique.
To remove the old rug, follow these actions: Cut the rug right into convenient sections utilizing an utility blade. If your brand-new flooring set up needs underlayment, you can reuse this. Use pliers or a rug puller to pull up the grassy sections (be individual, as this process can be taxing because of the variety of staples used to secure the rug) As soon as all the carpeting is eliminated, use a staple lifter or oscillating multi-tool to get rid of any continuing to be staples Getting rid of wood flooring is a bit more intricate, yet it's nothing an intrepid DIYer can not manage.
What does it mean to check the sub-floor? Search for any kind of indicators of damage that could impact the floor's integrity, such as rot, mold and mildew, or water damages. If you uncover any kind of indications of water damages, such as discoloration, bending, or mold and mildew, you'll require to resolve these issues prior to waging the flooring setup.
If your sub-floor has considerable damage, repairing Often, the damages to the sub-floor is so comprehensive that repairing simply the damaged areas isn't enough. In these cases, you'll require to replace the whole sub-floor. If this holds true, it can be a much bigger burden and time commitment. While it might be feasible to repair on your own, we recommend seeing your neighborhood RV repair service shop to establish next actions to make certain the stability of your floor.
Camping Trailer Repair Near Me Corona, CATrailer Floor Repair Corona, CA
Rv Trailer Repair Near Me Corona, CA
Camping Trailer Repair Near Me Corona, CA
Trailer Floor Repair Corona, CA
Travel Trailer Window Replacement Corona, CA
Camping Trailer Repair Near Me Corona, CA
Trailer Awning Replacement Corona, CA
Trailer Windows Replacement Corona, CA
Travel Trailer Roof Replacement Corona, CA
Travel Trailer Roof Replacement Corona, CA
Travel Trailer Repairs Corona, CA
5th Wheel Repair Near Me Corona, CA
Trailer Roof Repair Corona, CA
Travel Trailer Ceiling Repair Corona, CA
Travel Trailer Ceiling Repair Corona, CA
Rv Trailer Repair Near Me Corona, CA
Fifth Wheel Repair Near Me Corona, CA
Travel Trailer Furniture Corona, CA
Horse Trailer Repairs Corona, CA
Camper Trailer Service Corona, CA
Trailer Restoration Corona, CA
Travel Trailer Furniture Corona, CA
Rv Trailer Service Near Me Corona, CA
Travel Trailer Repairs Corona, CA
Fifth Wheel Repair Near Me Corona, CA
Travel Trailer Window Replacement Corona, CA
Fifth Wheel Service Corona, CA
Trailer Floor Repair Corona, CA
Trailer Floor Repair Corona, CA
Travel Trailer Window Replacement Corona, CA
Travel Trailer Service Corona, CA
Horse Trailer Repairs Corona, CA
Horse Trailer Repairs Corona, CA
Horse Trailer Repair Near Me Corona, CA
Travel Trailer Replacement Windows Corona, CA
Trailer Window Replacement Corona, CA
Travel Trailer Replacement Windows Corona, CA
Fifth Wheel Service Corona, CA
Cargo Trailer Repair Corona, CA
Rv Trailer Repair Shops Near Me Corona, CA
5th Wheel Repair Near Me Corona, CA
Horse Trailer Repair Near Me Corona, CA
Travel Trailer Awning Replacement Corona, CA
Travel Trailer Siding Repair Corona, CA
Travel Trailer Service Corona, CA
Travel Trailer Furniture Corona, CA
Trailer Restoration Corona, CA
Fifth Wheel Repair Near Me Corona, CA
Travel Trailer Replacement Windows Corona, CA
Rv Trailer Service Near Me Corona, CA
Travel Trailer Replacement Windows Corona, CA
Trailer Restoration Corona, CA
Horse Trailer Repairs Corona, CA
Travel Trailer Furniture Corona, CA
Camping Trailer Repair Near Me Corona, CA
Travel Trailer Roof Replacement Corona, CA
Camper Floor Repair Near Me Corona, CA
Horse Trailer Repairs Corona, CA
Fifth Wheel Service Corona, CA
Travel Trailer Window Replacement Corona, CA
Fifth Wheel Service Corona, CA
Travel Trailer Service Corona, CA
Travel Trailer Ceiling Repair Corona, CA
Trailer Floor Repair Corona, CA
Trailer Windows Replacement Corona, CA
Trailer Restoration Corona, CA
Travel Trailer Awning Replacement Corona, CA
Camper Floor Repair Near Me Corona, CA
Travel Trailer Repairs Corona, CA
Trailer Windows Replacement Corona, CA
Horse Trailer Repairs Corona, CA
Travel Trailer Repairs Corona, CA
Horse Trailer Repairs Corona, CA
Fifth Wheel Service Corona, CA
5th Wheel Repair Near Me Corona, CA
Travel Trailer Window Replacement Corona, CA
Rv Trailer Repair Near Me Corona, CA
Near My Location Seo Marketing Corona, CA
Finding A Good Seo Pricing Corona, CA
OCRV Center
Table of Contents
- – Travel Trailer Replacement Windows Corona, CA
- – OCRV Center
- – Trailer Floor Repair Corona, CA
- – Trailer Windows Replacement Corona, CA
- – Trailer Floor Repair Corona, CA
- – Rv Travel Trailer Repair Near Me Corona, CA
- – Travel Trailer Roof Replacement Corona, CA
- – Travel Trailer Siding Repair Corona, CA
- – Fifth Wheel Repair Near Me Corona, CA
- – Horse Trailer Repairs Corona, CA
- – Travel Trailer Ceiling Repair Corona, CA
- – Fifth Wheel Repair Near Me Corona, CA
- – Trailer Awning Replacement Corona, CA
- – Rv Trailer Repair Shop Corona, CA
- – OCRV Center
Latest Posts
East Irvine Camper Trailer Service
Rv Travel Trailer Repair Near Me West Covina
Camper Ac Repair Near Me Walnut
More
Latest Posts
East Irvine Camper Trailer Service
Rv Travel Trailer Repair Near Me West Covina
Camper Ac Repair Near Me Walnut