All Categories
Featured
Table of Contents
- – Trailer Window Replacement La Habra, CA
- – OCRV Center
- – Travel Trailer Service La Habra, CA
- – Travel Trailer Ceiling Repair La Habra, CA
- – Fifth Wheel Repair Near Me La Habra, CA
- – Trailer Restoration La Habra, CA
- – Camping Trailer Repair Near Me La Habra, CA
- – Trailer Restoration La Habra, CA
- – Camper Trailer Service La Habra, CA
- – Travel Trailer Floor Repair La Habra, CA
- – Trailer Floor Repair La Habra, CA
- – Trailer Windows Replacement La Habra, CA
- – Fifth Wheel Service La Habra, CA
- – Travel Trailer Window Replacement La Habra, CA
- – OCRV Center
Trailer Window Replacement La Habra, CA
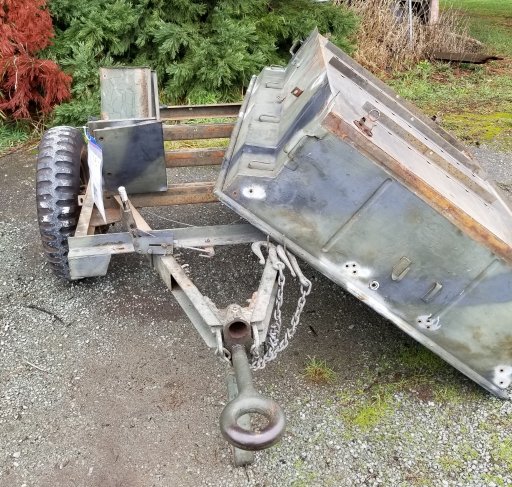
Here are before and after shots. I got the trailer home and pushed it in my garage. Time to reach work! The majority of the timber was attached to the trailer with old rustic bolts. I made use of an outlet wrench and crescent wrench for this action. You can see in the picture listed below that the old plywood required to be changed.
I finished up utilizing a pry bar to get rid of the wood. All of the plywood was successfully eliminated. Sweep and scuff all the dust and gunk out of the trailer structure.
Travel Trailer Service La Habra, CA
I utilized 120 grit sandpaper. If there are areas you would love to be much more hostile with I 'd suggest using a flap disk on an angle mill. It will certainly ravel welds and eliminate paint promptly. As soon as the structure has been sanded, eliminate lights if required and tape off locations you do not want painted.

The trailer is now prepped for paint. Usage enamel spray paint to make your trailer look like brand-new. I normally repaint all steel surface areas, even beneath.
Travel Trailer Ceiling Repair La Habra, CA
Because it is a just a trailer, I merely spray painted the edges with white. To safeguard the wheels from overspray you can tape them off.
Pin it This is what the trailer looked like after completing all of the paint. I affixed the side boards making use of 2 1/4 inch bolts.
Fifth Wheel Repair Near Me La Habra, CA
Classic Trailer Talk is an area to check out, go over, and blog post topics related to all things vintage trailer.
I'm a lil surprised out of all of those that picked one up, none have actually returned with viewpoints - Travel Trailer Awning Replacement La Habra. I simply looked via the "complimentary copy". I assume someone made a decent effort to share what they had learned with I think it is an inadequate influence on those new trailer owners who intend to "do it right" and in fact restore a trailer
The structures on these trailers weren't that strong. I disagree with having people believe they can make mold and mildew and rot "go away" by covering and or concealing it.
What of the new person hooked on the vintage trailer ownership concept that acquires one of these plagued trailers assuming it is "recovered"? The amount of people are conned each year right into buying one by a seller that recognizes complete well the condition, however misdirects to make an (unreasonable) revenue. So much, no person has actually been hurt that I have actually listened to by among these "patched with each other" trailers breaking down while diminishing the highway, yet someday it will certainly occur, hopefully not while before somebody you respect.
Trailer Restoration La Habra, CA
To those that just intend to take care of an old trailer and not "restore it", no worry, it can be a great way to delight in a trailer on a budget, however make certain you do it safely - Travel Trailer Awning Replacement La Habra. The old expression that goes something like; Accepting without doubt advice given by somebody trying to offer you something is usually a risky roadway to take a trip
I had the chance to picture a vintage trailer at the start of its restoration procedure. Can any individual inform me what it is from these pictures? Exactly how do you affix images to this?
Camping Trailer Repair Near Me La Habra, CA
Howdy. Currently prepare to keep something, this insane task can be a thrilling ride! I do not have a great deal of time to post now, to answer your questions all in deepness, yet let's simply claim, "start right here: "You will certainly find numerous video clips of all various phases of trailer restoration there, right to the nuts and screws of the building and construction of these old projects.
"Outside-in" is the correct approach for restoring, as they are put together in layers, instead of hung from a framework. Traveling trailers are not constructed like homes are. Genuine fast one more thing . Openings with the walls and roofing system must be sealed around fixtures using putty tape. Joints can additionally be taken care of without the taping process, although there have been some genuine good outcomes seen with the Eternabond things - Travel Trailer Awning Replacement La Habra.
Trailer Restoration La Habra, CA
Remember we are here to aid, and anything that seems like criticism is simply that, critical analysis, and absolutely nothing personal. Most of all, have enjoyable!.
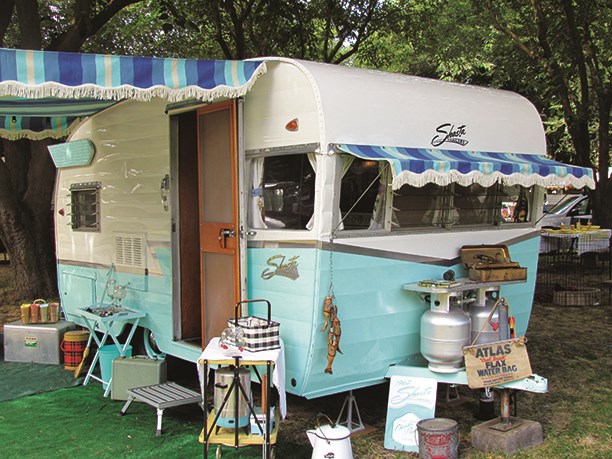
If you have actually ever before seen The Long, Long, Trailer with Lucille Sphere and Desi Arnez, you recognize the charm of the vintage trailer. There's something concerning seeing a completely recovered piece of the past that resonates with people around the globe. Of program, there's a big distinction between appreciating a remodelled vintage trailer, and doing the actual restoration.
Camper Trailer Service La Habra, CA
Instantly that desire trailer has come to be a cash sucking equipment. To recover a classic trailer you have to have enthusiasm or else your chance of sticking it out via the difficult work is slim.
Flyte Camp, located in Bend, Oregon concentrates on bring back travel trailers from the 1930s through the '50s. Far, he's doing an excellent work and loving every minute of it. Justin Scribner comprehends the aggravation of the typical retro trailer acquisition. "We have a great deal of trailer proprietors who get something out in the area or online," he told the Orgeonian in a June 2012 meeting.
Flyte Camp is in high need as one of the only business in the United States that properly restores vintage RVs. People all over the world deliver their vintage treasures to Flyte Camp for a remodelling.
If that's insufficient, it appears that Flyte Camp will soon be the topic of their own reality TV show. Audiences will certainly follow Justin and he searches for the right reconstruction jobs. One of things that makes Flyte Camp stick out from the pack is their degree of research.
Travel Trailer Floor Repair La Habra, CA
They intend to recognize the original trailer prior to recovering it to its former magnificence. Unlike the RVs of today, a lot of timeless trailers include attractive timber insides.
In the office they address 50-100 telephone calls and emails on a daily basis. What does a restored trailer price? Below's one example. The Scribners acquired classic trailer for a simple $2,400 a deal? Throughout a number of months, the team spent $23,000 on products and place in numerous hours in labor.
Trailer Floor Repair La Habra, CA
When you include up all the time and power, you require to like the work or it's rarely worth it. Over time he established an enthusiasm for mid century trailers and purchased one to provide recovering a whirl.
The trailer became a regular component in the Scribner's driveway. Justin worked on it when he had time.
In time, he conquered his first reconstruction, and his other half Anna joined him in his new discovered interest. The couple started to camp with their trailer taking short weekend breaks away.
Trailer Windows Replacement La Habra, CA
Today, Flyte Camp has six staff members and a 7,000 square foot store. They work on several devices at a time and take on whatever from indoor style to plumbing.
While Airstream obtain's a whole lot of press, Flyte Camp is everything about the early era trailers from 1935-1945. This was the elevation of the industrial style in the US and several believe these trailers are really an artwork. Regardless of the economic depression that swept the nation around this time period, lots of family members maintained sufficient money to purchase luxuries in life.
Fifth Wheel Service La Habra, CA
These trailers were normally created in the shape of a bread loaf and offered a tin roofing system with masonite house siding. Haute couture was king and the interior decorations were constructed with elegant insides like you could locate on an extraordinary train. Most of the trailers featured dark walnut or cherry timber with hand carved moldings and artful ceramic tile work.
In the 1940s the outbreak of Globe War II quit traveling trailer manufacturing. When the battle was over, travel trailers were hotter than ever before.
Every piece of the trailer was done by hand without a pressing schedule. They took the time to make points. Roadway traveling was still in its early stage and making individuals pleased was these home builder's main concerns.
At Flyte Camp they make every item of the remediation by hand. A repair typically entails getting rid of the trailer shell, removing out the electric and figuring out the problem of the frame and indoor panels.
Travel Trailer Window Replacement La Habra, CA
When Flyte Camp concurs to a task they do their finest to bring the trailer back to its initial magnificence. There's something wonderful concerning saving bringing an old trailer back to life.
You can restore it yourself. The Sande household in Redmond, Oregon determined to do simply that. They acquired a 1950's Traveleze for $1,500. They could not think their good luck. After that they began the job. They uncovered rot anywhere. From framework to the roof, the trailer needed significant assistance. Within a few weeks they understand that they were out of their league.
OCRV Center
Address: 23281 La Palma Ave Yorba Linda, CA 92887Phone: (714) 909-1444
Email: [email protected]
OCRV Center
Eric Sande figured out by hand that bring back a vintage trailer is not a weekend task. Eric called Flyte Camp to request for assistance. $25,000 later on the "canned pork" style trailer was done. "I initially assumed, 'Gee, if I spend $8,000 to $10,000 maybe it will deserve something,'" remembers Sande.
Travel Trailer Replacement Windows La Habra, CARv Trailer Repair Shop La Habra, CA
Horse Trailer Repairs La Habra, CA
Rv Trailer Repair Near Me La Habra, CA
Fifth Wheel Repair Near Me La Habra, CA
Travel Trailer Siding Repair La Habra, CA
Camper Floor Repair Near Me La Habra, CA
Travel Trailer Service La Habra, CA
Fifth Wheel Service La Habra, CA
Rv Trailer Repair Shops Near Me La Habra, CA
Travel Trailer Furniture La Habra, CA
Rv Travel Trailer Repair Near Me La Habra, CA
Travel Trailer Ceiling Repair La Habra, CA
5th Wheel Repair Near Me La Habra, CA
Travel Trailer Window Replacement La Habra, CA
Fifth Wheel Repair Near Me La Habra, CA
Trailer Windows Replacement La Habra, CA
Horse Trailer Repairs La Habra, CA
Trailer Awning Replacement La Habra, CA
Fifth Wheel Service La Habra, CA
Travel Trailer Siding Repair La Habra, CA
Travel Trailer Service La Habra, CA
Rv Trailer Repair Shops Near Me La Habra, CA
Rv Trailer Repair Near Me La Habra, CA
Travel Trailer Repairs La Habra, CA
Cargo Trailer Repair La Habra, CA
5th Wheel Repair Near Me La Habra, CA
Camper Trailer Service La Habra, CA
Trailer Awning Replacement La Habra, CA
Travel Trailer Floor Repair La Habra, CA
Horse Trailer Repair Near Me La Habra, CA
Travel Trailer Furniture La Habra, CA
Travel Trailer Repairs La Habra, CA
Horse Trailer Repairs La Habra, CA
Camper Floor Repair Near Me La Habra, CA
Travel Trailer Ceiling Repair La Habra, CA
Camper Trailer Service La Habra, CA
Travel Trailer Ceiling Repair La Habra, CA
Travel Trailer Roof Replacement La Habra, CA
Camper Floor Repair Near Me La Habra, CA
Travel Trailer Furniture La Habra, CA
Rv Travel Trailer Repair Near Me La Habra, CA
Trailer Roof Repair La Habra, CA
Travel Trailer Service La Habra, CA
5th Wheel Repair Near Me La Habra, CA
Camper Floor Repair Near Me La Habra, CA
Camper Floor Repair Near Me La Habra, CA
Cargo Trailer Repair La Habra, CA
Horse Trailer Repair Near Me La Habra, CA
Rv Trailer Repair Shops Near Me La Habra, CA
Rv Trailer Repair Near Me La Habra, CA
Trailer Awning Replacement La Habra, CA
Rv Trailer Service Near Me La Habra, CA
Trailer Awning Replacement La Habra, CA
Horse Trailer Repairs La Habra, CA
Horse Trailer Repair Near Me La Habra, CA
Camping Trailer Repair Near Me La Habra, CA
Trailer Restoration La Habra, CA
Fifth Wheel Service La Habra, CA
Trailer Restoration La Habra, CA
Trailer Restoration La Habra, CA
Rv Trailer Repair Shops Near Me La Habra, CA
Trailer Restoration La Habra, CA
Trailer Windows Replacement La Habra, CA
Travel Trailer Repairs La Habra, CA
Trailer Roof Repair La Habra, CA
Camping Trailer Repair Near Me La Habra, CA
Travel Trailer Ceiling Repair La Habra, CA
Horse Trailer Repair Near Me La Habra, CA
Trailer Window Replacement La Habra, CA
Travel Trailer Ceiling Repair La Habra, CA
Travel Trailer Window Replacement La Habra, CA
Rv Trailer Repair Shops Near Me La Habra, CA
Travel Trailer Replacement Windows La Habra, CA
Camper Trailer Service La Habra, CA
Travel Trailer Floor Repair La Habra, CA
Trailer Awning Replacement La Habra, CA
Travel Trailer Ceiling Repair La Habra, CA
Near You Seo Firm La Habra, CA
Around Here Seo Services Near Me La Habra, CA
OCRV Center
Table of Contents
- – Trailer Window Replacement La Habra, CA
- – OCRV Center
- – Travel Trailer Service La Habra, CA
- – Travel Trailer Ceiling Repair La Habra, CA
- – Fifth Wheel Repair Near Me La Habra, CA
- – Trailer Restoration La Habra, CA
- – Camping Trailer Repair Near Me La Habra, CA
- – Trailer Restoration La Habra, CA
- – Camper Trailer Service La Habra, CA
- – Travel Trailer Floor Repair La Habra, CA
- – Trailer Floor Repair La Habra, CA
- – Trailer Windows Replacement La Habra, CA
- – Fifth Wheel Service La Habra, CA
- – Travel Trailer Window Replacement La Habra, CA
- – OCRV Center
Latest Posts
Orange Rv Travel Trailer Repair Near Me
Orange Trailer Roof Repair
Tustin Rv Rubber Roof Replacement Cost
More
Latest Posts
Orange Rv Travel Trailer Repair Near Me
Orange Trailer Roof Repair
Tustin Rv Rubber Roof Replacement Cost