All Categories
Featured
Table of Contents
- – Rv Interior Furniture Walnut, CA
- – OCRV Center
- – Rv Sofa Beds Walnut, CA
- – Rv Interior Furniture Walnut, CA
- – Rv Replacement Awnings Walnut, CA
- – Rv Dining Table Walnut, CA
- – Rv Sofas Walnut, CA
- – Rv Dinette Booth Walnut, CA
- – Rv Dinette Booth Walnut, CA
- – Rv Microwave Replacement Walnut, CA
- – Rv Floor Replacement Walnut, CA
- – OCRV Center
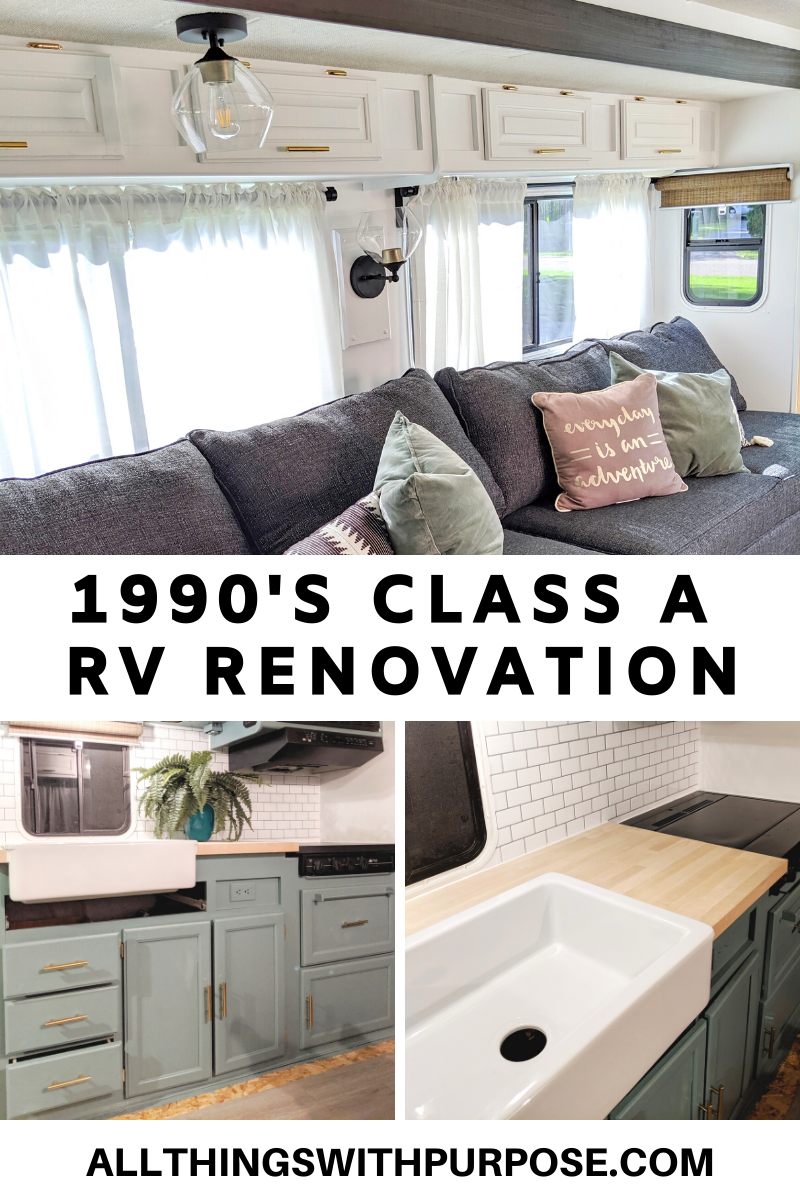
Rv Interior Furniture Walnut, CA
The essentials that will certainly obtain us begun went to the first, the decorating products and things like floor covering went to all-time low because we would not reach that till basically all the painting was done. As I cooperated our 5 most significant lessons we learned while refurbishing our RV message, we reside in the mountains so buying is already a full-day thing for us due to the fact that the majority of stores are 45 minutes down the mountain.
I suggest that you confirm the return plan on anything that you purchase for the remodel due to the fact that up until you see it where it's intended to go (also after determining) you might change your mind. Functioning with tiny areas is difficult, and in some cases you will certainly discover something that you like but that it's not always the best usage of the area.
I likewise recommend obtaining an account since you will get your products a lot faster! Prior to anything can begin, you have to repair any water damage or various other damages that your motor home might have, especially if they are indoor damages. If your damages is only in the outside, ensure that your recreational vehicle is secured versus the weather condition while you wait to reach it, that means it will not become worse.
Rv Sofa Beds Walnut, CA
By eliminating those cupboards, we conserved sufficient weight to replace with something different, we located a cupboard for the base of the idea that was the exact measurements we desired and taller than the old one so we can capitalize on the storage. We likewise took all the counter tops, the one in the kitchen area, restroom, the table in the dinette, and the counter in the nightstand of our room.
Most wall surfaces are either repainted boards or wallpaper. And depending upon how old your recreational vehicle is, you could discover even much more surfaces like glass and poly doors and various other plastic panels. Preparing each surface area for an efficient and effective treatment is not just the most time-consuming part of this entire process but additionally among one of the most vital! If you review my post concerning the 5 lessons we learned while redesigning, you already know that prepping was something we didn't invest also much time in the beginning, and we ended up functioning double because of this! [United States priming all the surfaces of the camper!] The brief solution is, it all depends upon the sort of surfaces that you have and the problem of your walls and cabinets.
We utilized a hand-held orbital sander that made the process so much faster than doing it by hand! The fining sand part, while annoying, is super essential to not avoid over since if your primer doesn't adhere well, the paint will certainly chip with any type of small scuff. We didn't eliminate the wallpaper on because, so removing it would certainly have been more benefit quite a lot the same outcome.
Rv Interior Furniture Walnut, CA
Because we rolled the paint on the walls and ceiling, repainting around the already painted plastic components was super easy. (Ken did attempt to spray the camper rather than rolling, however he really did not such as just how the coverage looked, so we chose rolling rather) Because I bought containers to arrange the cooking area as long as feasible, I asked Ken to build additional racks inside 2 closets so that my basket containers can fit flawlessly, in this manner I was utilizing every solitary inch inside the closets and maintaining whatever identified and arranged.
Below you can see the ended up racks, with lining and the boxes on top.

Equally as vital as selecting your paint is to choose the appropriate kind of guide. As I currently stated, if you intend to repaint over different kinds of surface areas as we did: wallpaper, laminate, and so on. We certainly suggest you choose a shellac guide (Zinsser Bullseye is what we use) or excellent oil-based primer.
In our camper, the only particleboard parts we had were mostly the closet framework, bathroom structure, and counter tops, but because we replaced all the countertops, we just worked on the remainder of the surfaces. When we picked our colors, I understood we wanted 2 very different shades.
Rv Replacement Awnings Walnut, CA
This left us without the kind of money we would need to get a "actual" butcher block counter. We put our reasoning caps on and assumed around making use of something various for the very same appearance.
We decided to likewise alter the table in our dinette, this way we might utilize the remainder of that cut to finish the countertop. It worked so completely! The joint lags our range top, so I placed a basket on the back to cover the seam. [this is the basket that I positioned to hide the joint in our countertop] I am so satisfied with the manner in which the counter looks, they have actually worked flawlessly even with no treatment on the top.
Below is a top view of the table in our dinette, this was very straightforward, Kenny just sufficed to size and changed the mechanism from the old table. Due to the fact that this table was a bit a lot more narrow than the older table, to make the improvement from table to bed job.
Rv Dining Table Walnut, CA
He also included a small piece of wood at the base of the side he cut to include assistance and stamina when utilized as a bed. By doing this, it looks good, however it's still functional in instance we require to use the bed of the dinette. As I've currently shared, among my concerns was to obtain the black sink and the peel and stick backsplash ceramic tiles.
I selected the full white metro ceramic tile since I actually suched as the appearance, I maintained going back and forth about either choosing the ones I did or the ones that have the gray "synthetic cement" and I was * this * near going with that =] The instructions are extremely easy, and it was quite easy to install, you do wish to make certain you have a tidy surface and the necessary tools for the task.
A note right here would certainly be to see to it that the RV is level because if the recreational vehicle is not level, your line will not be directly. You also want to begin at the bottom-left side of the area you wish to cover and work from there to the side and up.
Rv Sofas Walnut, CA
I also dry-fitted all my pieces with painter tape and peeled off a lower side while still having the painters tape on the top, so this means they were completely placed. When about an inch was stuck in all-time low, I removed the painters tape and proceeded to eliminate the support of the remainder of the item, this made the process very very easy, and I had no demand to get rid of any type of pieces to re-adjust.
, was to reduce the edge of the pattern to position it as close as possible to the side without having crazy lines.
I need to discuss that this rack lining has attracted attention the examination of not only time yet also, moisture and warm. Something that the shiplap one didn't!!! I'll describe more concerning the issues we ran into at the bottom of the message, but what you must recognize is that I am not delighted with the shiplap rack liner.
Don't get me wrong, the cubbies that I have in my craft space (that I cover with this exact same one) are still holding magnificently! There is not such an extreme variation of temperature level in our house, so it makes sense.
Rv Dinette Booth Walnut, CA
(if you have done electric job previously, if you don't know what you are doing, please request for suggestions from an expert, don't take the chance of injuries!). For the light in our room, we practically did the same thing, I made certain to pick something that was much more flush because we are both tall.
Because we wished to make one more for our house, we bought whatever in pairs, it was less expensive, but you can definitely purchase everything in singles. We currently had a switch from the old light we had there, so we didn't need an additional button, however if you do, this is the one we utilized in all various other lights that required it.
Rv Dinette Booth Walnut, CA
Let me show you a closer appearance: They are LED lights and means brighter than what we had in the past.
We utilized 16 of them to replace all the lights that we had left. Below is our camper today, BUT after a very deep clean due to the fact that our young boys ruin it every single time we stay there hehe! I likewise wished to state that given that we purchased whatever on Amazon utilizing my Prime membership, I knew I had the option of returning if I didn't like what I had actually purchased.
Let's discuss what we ended up doing for each area: For the, I fell in love with these set of buns listed below, they were in my price array and also in the modern farmhouse look I was after, you can examine them out right here. We just included buttons to the lights to make them totally useful in the recreational vehicle The only drawback of the set of buns is that they do not featured switches.(if you have actually done electrical work previously, if you do not know what you are doing, please request suggestions from a specialist, do not risk injuries!). For the light in our bedroom, we practically did the exact same thing, I saw to it to select something that was extra flush due to the fact that we are both high.
Given that we intended to make an additional for our house, we bought everything in sets, it was less costly, yet you can definitely get every little thing in songs. We currently had a switch from the old light we had there, so we really did not require another button, but if you do, this is the one we used in all various other lights that required it.
Rv Microwave Replacement Walnut, CA
Let me reveal you a closer appearance: They are LED lights and method brighter than what we had before.
We utilized 16 of them to replace all the lights that we had left. Here is our camper today, BUT after a really deep clean because our kids ruin it each time we stay there hehe! I likewise wished to point out that because we purchased everything on Amazon using my Prime subscription, I knew I had the option of returning if I didn't like what I had purchased.
(if you have done electrical job in the past, if you do not recognize what you are doing, please request for guidance from a professional, don't risk injuries!). For the light in our bed room, we quite a lot did the same thing, I ensured to select something that was more flush due to the fact that we are both high.
Considering that we desired to make an additional for our residence, we acquired everything in sets, it was less expensive, yet you can most definitely acquire whatever in singles. We already had a button from the old light we had there, so we didn't require another switch, but if you do, this is the one we made use of. Replacement Windows For Campers Walnut in all various other lights that needed it
Rv Floor Replacement Walnut, CA
For every single various other light in the camper, we changed the old lights with these tiny round LED lights, why? they are smaller sized. they conserve a load of energy. and look SO MUCH BETTER. the light is so much brighter than the yellow low light that our old ones offered. Let me show you a closer look: They are LED lights and means brighter than what we had in the past.
We made use of 16 of them to replace all the lights that we had actually left. Right here is our camper today, BUT after a really deep clean due to the fact that our boys destroy it every time we remain there hehe!
Rv Dining Table Walnut, CARv Replacement Awnings Walnut, CA
Rv Restoration Companies Walnut, CA
Rv Sofa Sleeper Walnut, CA
Rv Sofas Walnut, CA
Rv Carpet Replacement Walnut, CA
Rv Sofa Sleeper Walnut, CA
Awnings For Trailers Walnut, CA
Awnings For Rv Walnut, CA
Motorhome Carpets Walnut, CA
Rv Carpet Replacement Walnut, CA
Rv Interior Remodel Walnut, CA
Replacement Windows For Rv Walnut, CA
Rv Interior Remodel Walnut, CA
Rv Refrigerator Replacement Walnut, CA
Rv Floor Replacement Walnut, CA
Rv Couch Bed Walnut, CA
Replacement Windows For Campers Walnut, CA
Rv Replacement Awnings Walnut, CA
Rv Restoration Companies Walnut, CA
Motorhome Carpets Walnut, CA
Awnings For Rv Walnut, CA
Remodeling Rv Walnut, CA
Rv Upholstery Walnut, CA
Rv Chairs Walnut, CA
Motorhome Carpets Walnut, CA
Rv Dining Table Walnut, CA
Rv Sofas Walnut, CA
Rv Dining Table Walnut, CA
Rv Dinette Table Walnut, CA
Rv Dining Table Walnut, CA
Rv Interior Furniture Walnut, CA
Awnings For Trailers Walnut, CA
Replacement Windows For Campers Walnut, CA
Rv Restoration Companies Walnut, CA
Rv Replacement Furniture Walnut, CA
Awnings For Trailers Walnut, CA
Rv Microwave Replacement Walnut, CA
Rv Interior Remodel Walnut, CA
Rv Chairs Walnut, CA
Remodeling Rv Walnut, CA
Rv Microwave Replacement Walnut, CA
Replacement Windows For Rv Walnut, CA
Motorhome Carpets Walnut, CA
Rv Dining Table Walnut, CA
Rv Carpet Installation Walnut, CA
Rv Sofa Sleeper Walnut, CA
Rv Upholstery Walnut, CA
Rv Microwave Replacement Walnut, CA
Rv Dinette Table Walnut, CA
Rv Replacement Furniture Walnut, CA
Rv Sofa Beds Walnut, CA
Motorhome Carpets Walnut, CA
Rv Refrigerator Replacement Walnut, CA
Rv Replacement Awnings Walnut, CA
Rv Chairs Walnut, CA
Rv Carpet Replacement Walnut, CA
Rv Couch Bed Walnut, CA
Rv Dinette Table Walnut, CA
Rv Carpet Replacement Walnut, CA
Rv Dinette Booth Walnut, CA
Rv Dining Table Walnut, CA
Replace Rv Flooring Walnut, CA
Rv Upholstery Walnut, CA
Rv Dinette Table Walnut, CA
Replacement Rv Windows Walnut, CA
Replace Rv Flooring Walnut, CA
Remodeling Rv Walnut, CA
Rv Dinette Table Walnut, CA
Rv Restoration Companies Walnut, CA
Rv Dinette Table Walnut, CA
Replace Rv Flooring Walnut, CA
Rv Chairs Walnut, CA
Awning Installation Walnut, CA
Rv Dinette Booth Walnut, CA
Rv Interior Remodel Walnut, CA
Rv Dinette Table Walnut, CA
Motorhome Carpets Walnut, CA
Finding A Good Local Seo Marketing Agency Walnut, CA
Finding A Good Local Seo Service Walnut, CA
Replacement Windows For Campers Walnut, CA
OCRV Center
Table of Contents
- – Rv Interior Furniture Walnut, CA
- – OCRV Center
- – Rv Sofa Beds Walnut, CA
- – Rv Interior Furniture Walnut, CA
- – Rv Replacement Awnings Walnut, CA
- – Rv Dining Table Walnut, CA
- – Rv Sofas Walnut, CA
- – Rv Dinette Booth Walnut, CA
- – Rv Dinette Booth Walnut, CA
- – Rv Microwave Replacement Walnut, CA
- – Rv Floor Replacement Walnut, CA
- – OCRV Center
Latest Posts
Earth Sheet For Bed
Riverside Truck Service Repair
Fleet Repairs West Covina
More
Latest Posts
Earth Sheet For Bed
Riverside Truck Service Repair
Fleet Repairs West Covina